This page last updated 01/13/2016
All hosed up and no place to flow?
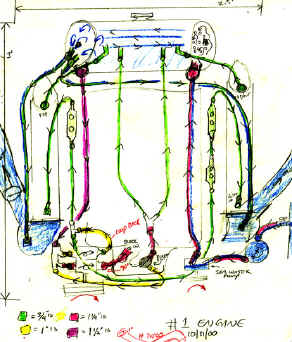
A "closed" cooling system outline, and the hoses and clamps that love them.
When I pulled all the hoses off my tired old 1969 Chrysler 383 engine, making ready for the rebuild, boy did I see a mix and haphazard of types and sizes of hose. Some were so soft I could easily cut them with my dull pocketknife. Others looked like they belonged to a washing machine. (Cheap washing machine at that.) A good portion of them didn’t even look like they fit, and were pieced, cut, and patched together with pipe fittings or whatever they could find laying around. How was I ever going to get them all back, and in their right places? As I found out later, the way it came apart, isn’t necessarily the way it should go back together. How could someone let this happen to such a proud ship?
I realized, most of what I was seeing was the result of "Band-Aid fixes" from more than one live a board in a row who didn’t take the boat out to use it. Old age and neglect took its' toll. True, I don’t expect engine hoses to last 30 years, but there is a time when you should change all of the hoses at once, and that time is now. During the complete engine rebuild. While the engine is out and on a stand. Now that I think of it, this probably is the first time the whole engine has ever been removed from the boat. There was some evidence the cylinder heads were removed, and on more then one occasion. When I bought this old boat I had to do some extensive hose repair work among many other things just to get the ol’ girl running and out of her slip and off to haul-out yard four miles away. |
|
These are some big wide engines, stuck down in compartments that are not that much bigger. After performing the difficult task of adding one or two more band-Aids I now understand why some of those hoses looked to be 30 years old. They were to much of a pain in the ass to get at…
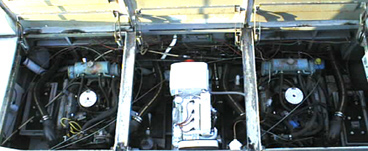
Well, now that the engine is out of that stinking nightmare of a hole and back from the machine shop. I will have the freedom and ease to move around the engine unhindered. We’ll get the best fit possible for all the cooling hoses. Also, while the engine is removed, a good opportunity to get in the bilges and do cleaning and painting. (That's another story)
Now it’s hard to talk about hoses without also talking about the cooling system therein. Now there are many types of marine cooling systems of which I have some basic knowledge. But, as to all their descriptions and theories of operations, I would digress. We’ll stick to just the one that applies to my "River Queen Refit" project. My cooling system is called a closed system.
"Closed System"
Closed system meaning the engine block, heads, manifold and a bunch of other stuff are all cooled via a coolant solution instead of (outside) river water, (like a car with a radiator). Now a closed system also uses a very important part called a "Heat Exchanger." It does the job of the radiator by using the river water to cool the radiator. Confused? Think of the heat-exchanger as being it being a radiator inside a radiator. The name heat exchanger in itself explains it all.
The open or (sea) side of a closed system path.
Cool river water enters though the hull below the waterline. A valve called a "Seacock" should be installed there so you can turn off the flow, (for obvious reasons). Water then should go through a unit called a "Sea Strainer." This guy is a large strainer that is big enough catch all the crud that may get past your intake grate, but still allow enough water to reach the sea pump. "Sea pump," A belt driven rubber impeller type pump, that charge’s the primary heat exchanger.
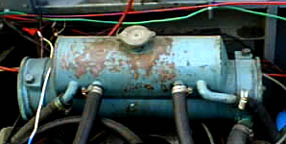
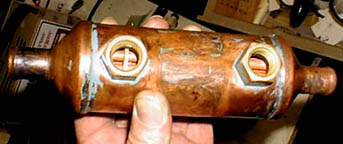
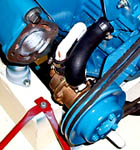
| The "heat exchanger" does just that. It has two distinct chambers. One chamber for engine coolant to flow in and out and one for river water to do the same. Inside the exchanger, the cool river water does some back-and-forthing by means of many copper tubes Immersed in the hot engine coolant. The heat from the coolant is exchanged to the river water. Which then exits and is sent to the... |
Primary heat exchanger. |
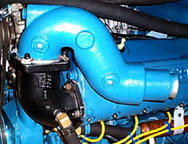
"Exhaust elbows." (Whose water jackets in this case are isolated from the exhaust manifolds.) Flowing through and around the exhaust elbows. Still collecting heat all the way.
|
The water is then ejected in a twirling fashion into the "Wet exhaust hose" to mix with the hot exhaust, and lastly, out the back of the boat. In my case into a vented boot on the transom and down below the waterline. |
Sound like a lot of hose’s? That’s just the Seawater side.
|
|
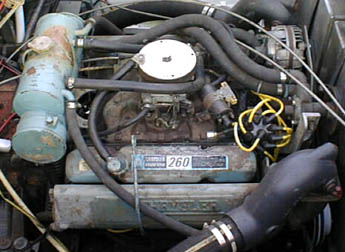
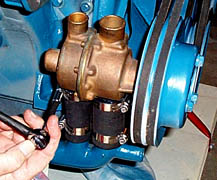
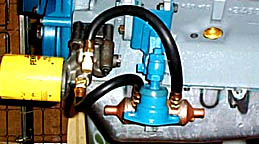
Engine side flow. Let’s start our detailed journey at the "primary engine coolant pump." This belt driven double pumper has two rubber impellers on a single shaft. Two in's and two out’s. The larger of the two outbound ports (1¼"ID) feeds right into the (cast iron) timing cover water jacket.
|
Coolant runs through the engine block and heads, coming out and up into the timing cover thermostat housing. Now this is the funniest looking thermostat I ever seen! But, it makes sense how it works. It’s more of a sleeve that slides up and down. When cold, the sleeve is low (closed). Cutting off the flow to the primary heat exchanger and open to a port above to flow back down to the suction side of the primary engine coolant pump. When the engine reaches its' operating temperature. (140f) The thermostat sleeve rises. (Opens.) (Hopefully.) Thus, cutting off the return flow port and directing coolant out and into the primary heat exchanger to be cooled. The primary heat exchanger then charges the bottom of the primary engine coolant pump via a (1½"ID) hose. Now remember I said the primary engine coolant pump had two in bound, and two out bound ports! The second out bound port is smaller. (1"ID) This hose does a loop back down to a "T" fitting. This "T" fitting charges the left, and right bank of "secondary heat exchangers."
"What the heck is a secondary heat exchanger?"
|
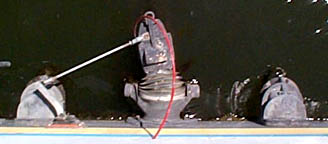
Well I’ll tell you. The secondary heat exchanger is designed to cool the things that normally get cooled by air but can’t because marine engines are down in a hole and closed up. Each of my engines has three of these cute little units. Made of copper, and as round and a bit longer as a Coors can. Each end tapers down to a (¾"OD) hose fitting. This is for the coolant to flow through. |
If you look in one end you’ll see small copper straw-like holes for the coolant to pass. (Coolant chamber). On the side of the unit you will see two fittings. One at each end. If you look in these fittings, you will see the sides of the straw-like copper tubes. (Second chamber). Here is where you would plumb your "in and out" fluid that needs to be cooled.
So back on the tour bus. From the "T" fitting (back) you’ll run in and out of the "Transmission oil, secondary heat exchanger." From there you plumb up to the "in port" of the exhaust manifold. Remember that we are isolated from the exhaust elbow riser. Coolant flows through and around the (right-side) exhaust manifold. From there it’s a short trip up and out and back into the primary heat exchanger.
From the "T" fitting (forward) you come around the front of the engine to the left bank. First you in and out of the "Engine oil secondary heat exchanger." Then in and out the "power steering secondary heat exchanger." Then, same as the right-bank, up into the left exhaust manifold then into the primary heat exchanger.
Let's count... 7 Separate hoses on the sea water side. 16 on the closed side equal 23 hoses. 24 if you want to count the over flow tube. Now times two for clamps. That’s 48. Now that is allot of hose.
Putting it back, right!
Let's talk about the advantages of using a closed system. But first the down side. Fact, it's one of the most expensive, and has the most moving and stationary parts. Each a possible weak link or maintenance point. Hose everywhere! The more hose you use, the greater the risk you have of having a hose failure. Whoa man! I'm bummin' myself out! OK. The good side. I like the idea of nothing but nice clean green coolant running around inside my system. It’s slicker then just plain ol water and good for you’re moving parts and pipes. Pretty color too! With an open cooling system, raw river water can leave sediment and foreign particles within slowly clogging up the works. With an open system, if you suck a plastic bag and block your intake, your system can go "super critical" very quickly. If you're not right on top of your temp gauges thousands of dollars could be lost due to burned up engine, and could leave you and your family stranded. The closed system will give you more of a margin to react as your temperature will climb slower. Lastly, a closed system will isolate you from salt water. For the most part anyway, and isolate us from clean water. Less chance to have an engine failure and accidentally pollute the water.
Time to hose things up!
Well we already decided that climbing down inside the engine compartment is the shits. Bruises, cuts and cramps. The less of that kind of action the better. I'm going to get the best quality hose I can get my hands on! I don't ever want to change another hose down in that hole as long as I can help it. I do know that there will be the time when I'll have to change the impellers on the engine coolant pump. I think I'll hire that part out. Not! (Like I would trust anybody but me to touch my engines).
The logic I’m thinking, behind a good hose job, would be to keep it as simple as possible. You ever go to the auto parts store and look up at all those odd bent shaped hoses hanging around the ceiling? That’s not simple! Well we don’t want to deal with any of those in the future. Not only is custom made hose hard to find when you need it, it will cost you an arm and a leg when you do. Here’s what I plan to do…
Anything that requires a bend or turn tighter than the hose off the spool will allow, gets plumbed rigid. That’s right. Rigid. "L" Series, thick walled copper pipe. Hand built using pre-fab 90; 45-degree fittings silver soldered in place. The silver solder is rated to 450 degrees. On-board spares need only be straight stock.
Hose Type.
My hose type has a rating of up to 250 degrees operating temperature, has a very smooth bore wall, and a double helix wire imbedded within. The exterior is of rugged heavy-duty rubber over a weave of nylon cord. It has a non-collapse bend ratio of about 10 inches. This is some good and tough stuff! I may never have to replace a hose again! Which, by the way, is what I’m aiming for.
Cutting hose:
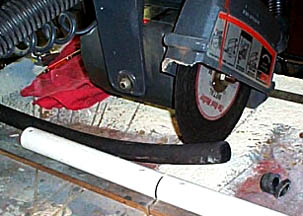
Most hoses you run into are made of all rubber. A good sharp mat knife and you're all set. It seems like "the harder it is to cut, the better quality of the hose." Well I must have some good shit because cutting through that "double helix" stuff is a real pain in the ass! At first I used hacksaw but when I got down to the imbedded wire the saw would drift with the direction of the wire and I would end up with a slanted rough looking cut with a sharp wire hanging out the end. (Real sharp! Bite ya like a snake!) So then I tried to cut it with a mat knife, then nip the wire with cutters. This was twice as labor intensive and twice the danger using that razor knife. Then it donned on me. I was going at it all-wrong. I have at least (48 hoses x 2 cuts each = 96 cuts.) a lot more cuts to do. If I continued cutting hose like this, I’d be worn out and dripping blood for sure! ? What do the big boys use? "Power" I like power. Time to go see the pro’s…
After a lesson with the good ol boys down at Motion Industries, (hose specialists), off to the hardware store I went. The end to all my problems cost me eight and a half bucks. I bought a 10-inch composite metal-cutting blade that would fit in my radial arm saw. Nice and fast perpendicular cuts are mine to command! I makes a foul burnt rubber smell and sparks fly out the back, (Cool). The cut ends come out looking so nice you hardly need to trim anything. Those wires are still there, and even sharper than before! But as least they’re not hanging out ready to bite! To finish off the hose before installation, I use a little spring tool to hook and draw up the fang of the beast and buzz off the barb with a small hand grinder. Once properly trimmed and de-fanged, our hose heads for a good scrubbing with a brush and hot soapy water. Being sure to remove any bits of metal and rubber inside the hose itself. With the hose free of any grease, oils and dirt. It will be ready to receive paint. "Ya I’m going to paint it too." Before this magnificently cut, high quality hose will be installed in the engine I will dollop the ends and inside with a light coat of RTV to seal the end. Add to the ease of being installed on the fitting, and help the seal overall when properly clamped into place.
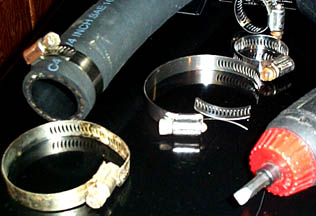
Are we properly clamped you say? Adjustable hose clamps.
What can you say about clamps? The things that hold tight the ends of your hoses. They're pretty. They're shiney. I can say I once got a nasty cut from a over-sized clamp that was tightened down with a lot of excess strap hanging off the end. I've also ruined pants and shirts as well. Quite often people don’t think of how they install them, or how they're laid out. "Oh by the way, I think I’ll just leave this sharp blade thing just sticking out here where I may bump into it later." If you’re going to use a clamp, use the right size! OK, I’ll admit it. I too have used too long of clamp. But I learned my lesson and have the scars to prove it!
When I removed all the hose clamps from my engine during the start of my rebuild. I must have had 50 or more hose clamps in a pile. Anything that was not stainless steel I tossed out. I collected the rest of them in a big plastic jar with a lid and tossed in a strong mixture degreaser with a hand full of ball bearing’s for good measure. Then sealed it up. Every time I remembered as I passed by, I would pick up the jar and do the "Shake it up Dance." You too can do the shake up dance. No music necessary, but it helps. And there they sit, to steep in their own juices. Till I need them back.
Reusing hose clamps.
If I was a wealthy man, and cost was no object, I would buy all new hose clamps and be done with it. But I’m not. There is no shame in reusing old hose clamps. As long as they’re still good that is. Most clean up quite nicely. Let’s face it, they ain't cheap, and I ain't made of money. It’s easy to tell if you have a bad clamp by looking at the band and see if there is any damage on the teeth or slots. Any excessive rust to the barrel or tight kinks on the band, or busted teeth and I would toss it out. When you have a clamp that you think is OK but still not sure, try to fix it. Here’s how. First clean the heck out of it. I use an old toothbrush and a shot of degreaser to take off the top layer of crud. New toothbrush’s work better, but make darn sure it’s real clean before you put it back in the medicine cabinet. (Turnabout’s fair play) Then off to the sink for a hot rinse. This will afford me a better look at the unit. It will help me decide weather to toss it or move on. Moving on. Sometimes when a larger clamp is run down too small. Smaller then it was designed to go. The metal folded over part that holds the barrel screw thing in can bend away and allow the screw thing to fall out. If this is the case, and there’s no busted pieces. Just clean it. Give it a drop of oil, and put it back in. Then flip it over on a flat surface, using a small hammer, tap the ends a little flatter. This should lock the screw thing in place where it can turn freely but still not fall out. Now to the strap or band or whatever you want to call it. I use a 3" smooth, clean piece of pipe in a vise, and place the strap with the unwanted bend on the pipe. Again I tap, tap, tap with my little hammer here and there on the high parts. Smooth out any odd bends. It takes a little time spent bending it this way and that way but soon you end up with an acceptable if not new looking shape! Any burrs, ticks or sharp edges are removed with a small mill file. Almost done. Lastly I scrub it one more time with a soft wire brush and degreaser. A quick rinse in real hot water. Compressed air is used to remove the excess water and hand dry it in a soft clean cloth. Then a small drop of light oil at each end of the screw thing. Test it. Feed the strap end into the mechanism and run it up and down with a electric screw thing driver a couple of times. Seem OK? Good! A slight mist of WD-40 and a final cloth wipe down to remove any foreign bodies and fingerprints and sit back and marvel at the beauty and splendor of a job well done! As I did. "Ooh, Shinny!" I ran straight into the house. "Honey!" "Look what I did!" Don’t forget to bring an old, bent sample with you as I forgot! With a shaking, scared, and dirty gnarled hand I held out the perfect, shinny, better than new little hose clamp. "What?" She said. "Did you cut yourself?" and started looking all around my hand for the cut she was sure she would find. "The clamp." I said. "Oh, the clamp. Very nice dear…" At that point I made her come out into the shop to show her all the old and bent clamps on display, and explain to her the cost savings. Once explained, she then showed proper marvel and admiration at my efforts. Then asked me if I was sure I didn't cut my hand? Then to "get cleaned up honey, it’s almost time for dinner."
I haven’t got all 50 or more clamps finished up yet. I tend to do them as I need them, but I can do 3 or 4 in ten minutes or so. The more you do, the faster you get at it. It sure as hell beats throwing money at it. Besides, my wife Deborah thinks I’m thrifty and talented. ; )
Installing hose clamps.
I believe that there is much more to the installing process of a hose clamp than just sticking it on there and running it down. First of all you have to figure the ending position you want it when it’s tight. Because it will move when you tighten it. Then you have to consider "can I reach it with a tool when I’m hanging upside down in heavy seas?" "Will there be another component in the way when I do need to replace it?" So possession is important. I take the hose to be installed and pre-fit it. Hold it up to see just where I want the clamp to be. Place the clamp on the hose vary loosely, 3 or 4 inches down from the end. Time to do a "Fit check." While the clamp is not yet very tight, check to see how much extra strap you have hanging out the end. If you have more than an inch, mark it, remove the clamp, and cut it off with a pair of snips. (Most important!) Always file the trimmed end until it’s dull to the touch! If you skip this step you make matters worse then if you had left the end long and hanging out! For the finishing touch. Take a pair of needle nose pliers and at about ½ inches from the end of the strap give it a slight inward bend. Again at 1 inch too. This will cause the tail end of the strap to hug nice and close to the tightened band reducing the risk of torn flesh and clothes. The little extra time it takes to properly size your clamps will certainly add to the professional look to your project, as well as add to the safety of your engine compartment.
Too tight a fit.
Some of my cooling components are copper. Most of which were damaged on the barbed fittings due to someone putting down to much power when tightening the clamp. To the point of collapsing the soft copper fitting inside the hose and restricting the flow of coolant. Easy dose it on the soft copper stuff! If your hose is the right size in relation to your fitting, you shouldn’t have to exert very much pressure to maintain hose integrity. When I tighten a hose clamp I first use portable electric screwdriver to run it down to get the clamp in the right possession. Then a mini socket and ratchet to take it the rest of the way. Using a small tool will help keep you from going to tight. Big tools with long handles can deliver too much power. I learned that less on when I was 16 years old and twisted a ½ inch bolt off in a engine block on my dads truck using a long handle box wrench. Oh he had something to say all right! But when he regained his composure, we went down to the local hardware store where he bought me my first "easy-out kit." Then took me back home and showed me how to use it. I still have it in my tool bag today. Dad doesn’t remember.
Back to the...