Lets all get properly tanked!
Fuel tanked that is...
Gasoline tanks and their condition are quite often overlooked in the privete sector of the marine world. Kind of an "out of sight, out of mind" thing. One of the little tid-bits I learned from my machine shop guy was concerning the condition of my fuel tanks. Old gas is bad gas. Bad gas is bad doo doo. Gas for some reason, gets varnished up as it degragates, or gets older. It can stick to the inside of the engine and other vital parts like glue! Fuel pumps, valve guides, jets and injectors and more can all get gummed up from using to old of gas. The end results can cause significant loss of mileage due to inefficient fuel flow or worst case (my case) damage parts like a seized valve. I'm also told that if you don't remove all the old bad gas, and clean out your tank before your rebuild goes into service the same thing can happen all over again and harm your new clean engine! Who wants that? Not me! Hell no! Without getting into the science of gasoline and all its' properties (like I really know) but I have read my fair share of fuel related articles and fuel additive labels as well. They say gasoline can be stablized up to a point. For the winter season it's ok. Even longer sometimes. Octane boosters can be added to jazz up older gas. But if your gas is three years old or older like mine was, your running a risk of gumming up the whole works and damaging your engine. My gas was at least six years old when I bought our new old boat. I know this because the guy I bought it from said that he hadn't moved the boat in that amount of time. (live aboard). Using a stick I was able to dip the tanks and found that I had about 2 inches of gas in each tank. Using the math described below I determined that I had approximately 4.15 gal per inch. So, like a fool, instead of taking out 24 gallons of known bad fuel before I started up, I dumped in a bunch new fresh fuel with some octane boost and stabilizer. Only to realize much later that I had only contaminated the new fuel, and wasted alot of time and money. The #1 engine did run though, very poorly and for a short amount of time, before it died. (See chapter " Engine Rebuild" ) All I can say in my defense is "this engine was all done anyway." : (
Tank Removal:
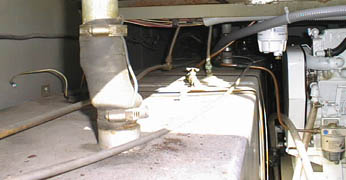
I have three tanks in all. Port side is what I call #1 tank. Starboard is #2 tank. Center tank is #3 tank.With #1 engine out and in the machine shop I was given all the room I needed to remove the #1 fuel tank without much trouble. First I pumped the remaining gas over to the #2 tank. Removed the vent lines, supply lines, hold down straps, fuel gage wires and lastly the fuel feller tube with ground strap. It lifted out easily with two people. With the #1 tank removed, we now had access the #3 tank. Doing the same, pumping all that bad gas to the #2 tank to lighten it first, we were able to slide it to port where the first tank was for another easy extraction. A stick measurement of the #2 tank shows I now have to find a way to get rid of over 60 gallons of contaminated gas. The #2 tank will be drained and removed after we get the #2 engine out at a much later date I'm sure. Probably next year. Now with the #1 engine, and #1 and 3 tanks out of the way, clean up and painting of this portion of the engine compartment will be much easier.
Fuel tank transportation, inspection and repair.
Well boys and girls, this one is best left up to the professionals. Many lives have been lost and homes burned to the ground due to home fuel tank repairs. I would never venture to tell anyone how to proceed here. What I can do is warn you that gas tanks, whether they be full or empty are very dangerous! They have a tendency to blow-up by making even the smallest of mistakes! Mis-handling in transportation is also dangerous. Whether due to a drop or bang, or even (here's a new one I'm told happens alot now) a static discharge from a truck bed liner. Caution is the best word.
So please heed my warnings people. If you are not entirely confident in your knowledge of safety requirements with regard flammables and containers thereof, you are better off to hire out the job to professionals. There is no room for mistakes here. Remember, your life and the lives of others, are at stake.
What is my tank capacity?
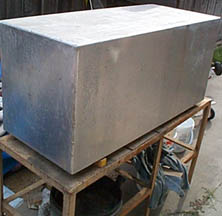
Lets do the math. If you're like me and not sure what what your current fuel capacity is, get yourself a tape measure out and figure out the cubic square inches of your tank. Luckily my tanks are a rectangle so its easier to figure.
Math sample of my tanks:
My tanks are 22' high, 20'' wide and 48'' long.
So the first thing we figure is width x Length in inches, (20 x 48 = 960)
Then take that sum times the the Height. ( 960 x 22 = 21,120 )
OK, now we know that we have roughly 21,120 cubic inches of total space including the tank material itself. We can discount the tanks mass later.
Now we all know for a fact that one US gallon is 231 cubic inches. (OK, I had to look it up too.)
Divide our total sum by 231 ( 21,120 divided by 231 = 91,428571 ) Just under 91 and a half gallons.
Now without knowing the thickness of the material to discount its' mass I would venture to guess this was a 90 gallon tank.
With 3 tanks in service my max fuel capacity is ( 90 x 3 = 270 ) US gallons. Given today's gas prices at the dock about $2 bones a gallon = $540.oo I don't think I'll be topping off anytime soon.
It wasn't 'til I had removed the first tank that I got to see the inside. The way the tank is stuffed inside the back of the engine compartment you can't get your head in to look see. I had always wondered why all my fuel gauge's didn't work? It was because every float had rusted and rotted off. Absolutely no chance of working. I was also suprised to find metal shavings and the piece of metal from the hole saw amongst the several inches of muck. I can't believe the engines ran at all with all this shit down in there? Lesson for you. Something to look for when you look at a prospective boat to buy. Can you find a good in-line fuel filter installed? Can you find a filter on the the carberator? My boat had neither when I bought it. Know wonder the mechanical fuel pump was wasted and the engine on its' last legs.
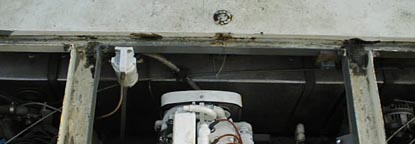
The reinstallation of fuel tanks can't possibly proceed 'til the compartment is ready to receive it. This means removing all the screws in the support boards to get at the bildge, and the boards that serve as a pad to keep the tanks from rubbing the bulkhead. In the engine compartment, the bildge is flat. The keel doesn't start until the fore side of the water tight bulkhead. Oh the things I found under the support boards. This is a space of almost no return. That 3 inches under the fuel tanks is impossible to get at. I found screwdrivers (3), many nuts and bolts, hose clamps, trash and 25 pounds of oily sand, mud and muck. Once again I must warn you of scraping and poking the hull skin below the waterline! Of course this dosn't matter if you're hauled out and haven't finnished the outer skin yet.
Do a good job of cleaning and painting inside and around where the tanks are. Hopefuly you'll never pass this way again. I once used a gloss paint in the bottom of my boat. It looks nice and wipes off clean but I didn't like the way it looked wet from a distance. "Damn! Is that water in the bottom of my boat?!" So now I use a flat primer gray. Much easier to see if it is wet, or just looks wet. If the support boards are still in good shape, give them a good coat or two of high quality oil base paint as well.
I'm not sure yet if I'm going to put all 3 tanks back in or not but I am sure I'm going to put down thin rubber sheeting anywhere the tank touches anything to reduce wear from vibration. With the tank isolated in this fashion there is a risk of static discharge! That means a spark could occur during refueling or maintenance. (That would be bad.) To avoid being blown ski high or any other unthinkable firey demise, make sure all fuel tanks are properly grounded with a "Grounding strap" to the frame or bonding ground. With my tanks so tall, I better be sure to install the new fuel gauge float before hand. Strap them down. Do hoses and vents and plum in your fuel line feed. Sound easy? I'm sure it won't be. |
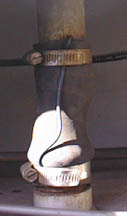
This is how it was before I removed it. This is not my idea of a good grounding strap. Also note the swelling in the hose. When I cut it away, I found flaking rust around the fittings. Think I'll need to replace the deck fitting as well. |
I would like to go back in with all new "ridged" fuel line. The factory installation was 3/8 flar copper. I'd like to go with stainless steel. I am now a firm believer of high quality state of the art "fuel filter / water separator. " Got to have it!" I got three new "Racor" units. One for each engine. In my opinion, the best you can get.
You need to call: Robin MacDonald (Market Manager, Marine ) He can and will prove to you that Racor is the best you can get! "The most complete protection on the water for your boat!" |
(800) 344-3286 ext 7443 rmacdonald@parker.com / www.parker.com Tell'em you saw it here and "Wolfeman" sent you! |
I also decided to omit the mechanical fuel pump on the engine for a electric pump for several reasons. Access to service the old pump is next to impossable. It's right behind the primary water cooling pump. An electric fuel pump can be mounted in easy reach. It's a good idea to keep a spare pump on board.
A word of warning. Any time you work with fuel, great care is paramount in the installation process as well as the material used. If you are not sure how to do it. Find out how. Don't guess and wing it! I use only flair fittings. Bezzle / collar / crimp type can vibrate loose. Use only USCG fuel line and thread sealer designed for fuel fittings.
I'm sure bad fuel played a big part in the slow demise of my engines. Before this project I had no idea the importance of proper fuel management, and how it reflects on the performance and longevity of an engine. Below I'll list a few tips I learned along the way. Maybe it may save you the strife I suffered ...
1. Don't leave your fuel long stints without adding stablizer.
2. Keep your tanks at 3/4 full when ever possible. An empty tank will collect condensation (water) and rust fuel level sending units (floats).
3. Most important! Use a high quality fuel filter / water separater.
4. Use the best material you can get. Hoses, fittings, tubing. Not just what is required.
5. Buy good gas. How can you tell? Hell if I know. It used to be "You get what you pay for." Now it seems you pay through the nose for whatever people want to give you, and "tough s__t, just give me your cash" attitude from the uncaring money grubbing schmuck behind the counter.
Back to "The River Queen Refit"
From the "River Queen Refit"
Mike Wolfe 11-4-00