.jpg)
Tanks were shipped as is. No box needed...
Top is the 110 gal black water tank.
The bottom two are the 70 gallon fresh water tanks.
Mike Wolfe "The River Queen Refit" The Head.
The Head... (Updated 1-9-10 Pictures)
At times it can be the very most important subsystem in the whole boat! It can give you the greatest of pleasure or cause the ultimate in frustration and stress. It may not be a mission critical system to some of us guys but I know for a fact it is to my wife. Have you guest? I’m talking about the toilet and black water holding tank. The all so important unit that you hope and pray will never fail. It never seems to hold enough. You yell at the kids in the head when you hear them in there pumping the water like crazy. "Hay in their! Easy on the water!" Oh, it was a guest... Sorry. There must be complete trust in every component in the system.. The failure of one part could smell, er, spell disaster! Yes, I reserve the right to write about it, because I’ve been down that road. The following story is for you. Heed my words and boon from my loathsome failures. Short cuts are a no-no.
As it was:
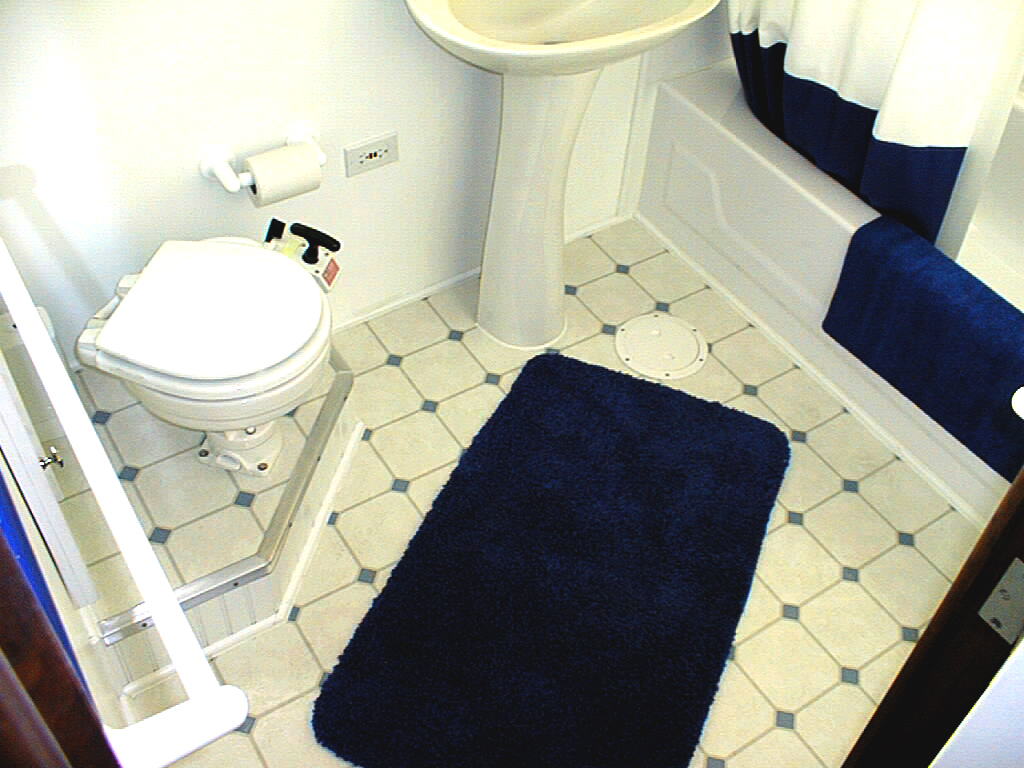
The head was the nicest looking room on the boat. It was decorated with color and stile and had a lovely looking pump toilet. It was a little low for my liking but looked clean and functional. Well as bad luck would have it, the floor had a lot of dry-rot. Dry-rot and wet rot! So out came the head, sink and floor. What a mess! I could go on and on about the whole bathroom project but I’ll keep my cements to the subject at hand. There was no existing holding tank. The toilet had a through pipe straight out the bottom of the boat! How gross! A big no-no in California. Wile in haul out I chopped off the pipe and had a steel patch welded over the exit port, never to be used again. Of course this meant that I had to find and install a suitable holding tank. In the perfect world we buy the biggest and best and just pop it in and be done with it, right? Well, we were all but out of funding due to the extensive expensive repairs on the haul out. I had to come up with something. So I found an old fresh water polypropylene tank. About 37 gallons was my guess. It wasn’t plumed quite right so I took it to the local RV shop and had them spin in a large fitting in the bottom for pumping out. Interesting process this "spinning in." They core a hole in the tank where needed. The hole is just larger than the fitting. Then they put a high speed motor on the fitting and spin it in place. The friction of the tight fit causes both tank and fitting to molten and bond when cool. No glue. Done by a professional. Looked good to me? After a fare amount of blood sweat and tears the tank, vent and pump out line was installed and functional. There was much rejoicing.
I may look dumb but I’m not stupid. I did stress test the tank at home before I installed it in the boat. I filled it with water and banged on it with a rubber mallet. I double clamped every fitting then sealed everything with 3M 5200 and used a high quality non permeable hose designed for the job. The toilet received a new rebuild kit and the tank was strapped down to a nice custom made and painted board below the galley. Everything was happy in toilet-vill.
The first headache...
Filling the tank was naturally the easy part. In what seem like no time at all there came a foul smell on the vent side of the boat? The tank was so full that water dripped out the vent tube when the toilet pump pumped. "Oh crap!" So lets go pump out as soon as possible right? We were glad to get to the pump out dock. Man, I was so tired of dumping that damn portable chemical toilet, the worst job on the boat and for some reason it’s all mine!
The dock attendant walked up holding a big 3 inch cam-lock hose wanting to know where my pump-out fitting was? The problem was I had installed a nice chrome flush mounted unit that used a inch and a half thread in. "Well that will never fit" he said and off to the shop he went. Some time later he and his boss came back with some wacky modified looking thing and proceeded to try and extract the waste from our boat. This turned out to be quite a fiasco! Seems all the pumps at my marina are of a "diaphragm" type pump. They need to be primed and hold a vacuum, the hose needs to be held just so. The pump we pulled into I understand was the worst one of the bunch. Pumping out turned out to be one of the biggest pains in the ass! It seems we kept breaking suction and losing our prim. The attendant asked if we wanted to stick a hose in the toilet and suck it out that way? Clearly he was used to pumping out rental houseboats with a straight drop into the tank like an out house. (The simplest of designs work best I guess.) We finely felt we were empty enough and completed the operation. We tipped our dock attendant a five and headed back to our dock with our very first pump-out behind us.
By the next pump-out, witch came all to soon I might add I was ready with new ideas and equipment. This time by god I was going to be better prepared! I had a friend at the hose shop make me a "interface cupeling." One that fit perfectly in my deck port and had a two foot clear thick walled hose to a male cam-lock fitting. I had greased the threads in the deck fitting for a nice air tight connection. The clear hose may seem gross and it is, but this way you can monitor the flow of waste. I had the new adapter all hooked up and ready to rock and roll before I even pulled away from my slip. I also had made it a point to drive down and ask the dock hands just which pump worked best so as not to get stuck with a bum pump this time. I’m happy to report that subsequent pump-outs went very well. This lends truth to the old adage... "With repetition comes ease."
We had used a pump out station closer to town a couple of times that used a vacuum system. I liked that! Man it was a good sucker! The unit worked in a fraction of the time and seemed to give a more complete evacuation. One thing I did realize was that my vent hose was way too small. (1/4 inch. I D.) I was worried about that old tank cracking under the stress of the vacuum and had to go easy on the control valve from then on.
With most of the kinks worked out of the system and pump out process, we enjoyed a short respite from "Holding tank Hell."
The worst happened:
We were coming back from a long 4th of July weekend. Good times were had by all. The boat worked perfectly. The ice lasted. The food and drinks lasted too. Nothing broke, nobody was killed or hurt. Truly a good trip all round. It was late Sunday heading back and had a strong cross wind as we approached the service dock. Holiday traffic around the marina and launch ramp was high so instead of dealing with all the hub-bub of people and pumping out then and there I opted to head straight in to our home dock and call it a trip. It would be easier to come back later in the week after work when traffic was light and things were more back to normal. Well it ended up being the next Friday before I managed to make it back out to the boat.
When I opened the door that Friday afternoon and stepped inside I was immediately hit with the most foul smell! Oh God! The worst had happened. There is only one thing that can smell like that. I had left the holding tank full all last week. This is the point that proves the difference between men and boys. The boys ran, I stayed and went looking for the source of the evil smell. And I found it. Under the holding tank where the we had spun in the drain fitting it was a split and leaking. Who would have thought a slow drip could cause such a stink! The tank was still mostly full thank god. Needless to say my wife and I spent most of Saturday de-installing the old tank after a good pumping out. It went fairly fast but oh I had to be brave and crawl down in the bilges! It was then and there I swore I would never install another holding tank with plumbing in the sides or bottom! Never!
This was going to be a big "Do over" and I was going to do it right this time. It was going to cost me money and time, sweat and more money but I didn’t care! I was going to re-vamp the complete system. Install a new tank to my specifications. A big tank this time. With all the plumbing through the top for greater integrity.
So what’s next?
Locate a proper tank I would think would be the first order of business. So of course I went to all the local RV stores and looked at all of there catalogs. I was wrong to do this. This is a marine application, you just got to suck it up and spend the bucks for the real deal and buy a thick walled marine rated tank. So off onto the internet I went. I surfed as I had never surfed before!
Every company I found that was a possible tank provider, I sent a basic e-mail letter that described my basic situation, wants and requirements. I tried to sound personable and friendly which is the way I like to do business. I found and started up a dialog with a number tank suppliers on the internet. Now I know I can be a pain in the ass customer alright? I tend to ask too many questions and require the personal touch. I’m sorry to say that I found the bulk of the industry hard shelled, impersonal and way too expensive. I got a lot of "Take it or leave it. Pay up and shut up." attitude.
Ranting...
We are all people here, not machines. I think we (as a customer) deserve to be treated as human beings. In today’s market place where the margins are too tight for bottom line business. I’m sorry to say service suffers greatly. So many companies now cut back so far that it’s all the low paid over worked lowly employee can do is run there ass’s off to keep up. The CEO’s sit on top and collect the bounty to feather there nests. They shout down new cost effecting directives as the workers get more and more un happy with there job. Know body wants too hear my shaggy dog story or talk like real people. It’s "Take it or leave it... Next please." Too damn bad I say.
I think this is the main reason I received mostly 4 and 5 word responses from most all the company’s that I solicited for information. That’s if they bothered to answer me at all...
There’s a happy ending to this part of the story. I received a response from Walt Wilson at "Ardemco Inc." in southern California. He took the time to write paragraph or two and even sounded like he had a personality when he wrote. "Shock" A real person! He answered all my questions completely then beat the competition hands down in pricing. After three or four e-mails back and forth it was time for a phone call or two. Like I said before, I’m a pain in the ass customer and need to know everything. I blame that partly on the fact the I write about it. Walt had no problems taking the time too talk about design changes, engineering and holding tank logic. I learned many new things from Walt and yes, I’ll share some...
When it cones to a black water holding tank’s on a boat it’s usually best to install a "Stand pipe" or "Dip tube" to remove waste from the top of the tank. Not only dose it help maintain the integrity of the walls and bottom of the tank, but it keeps waste from standing in the pump out hose. As you might know bad smells can permeate some hose and smell up the boat or even worse, leak!
I learned the hard way that when you have someone install a "Spin in" tank fitting, it had better be done by someone who knows how and dose it every day. If they say "Ah, I think I can do that." You don’t want them to even try. Not when it comes to holding back gallons upon gallons of shit!
Another thing Walt told me that made sense is the danger of installing metal fittings in a poly tank. The two different materials will expand and contract at two different rates do to there different density’s. This can cause cracking and leaking over time. Faster in more extreme weather.
I asked him about the deference’s between the fluid level sensors and how there installed. Walt preferred the installed in tank sensors over the kind that attaches to the outside of the tank do the fact that sometimes it’s hard to keep things adhered to a poly tank. Stick-on Sensors have been known to fall off from time to time and have to be reinstalled.
We also talked about holding tank chemicals. I hear so much from so many it’s hard to get the strait poop. (Sorry) I always thought the bio type with active enzymes that actually eat the bacteria was the best way to go. Well it is if you give the little bugger’s time to do there work. As in, you have a large holding tank and only a small number of people and time between pump outs. But if your loading up with company for a long weekend and plan to pump out when you return then maybe the chemical based product may work best and be more cost effective.
It took awhile and some head scratching to determine the size and shape tank I wanted too use. The list of tanks Walt provided to choose from was large and varied. One was sure to fit just right. I chose a 95" long, 33" wide and 9"flat tank. To fit crossways under the galley sole. 110 gallons. That should hold a turd or two... Wile I was in "tank buying mode" my wife Deborah insisted we go ahead and get two new freshwater holding tanks as well. So we also bought two 70 gallon tanks to go up front under the helm. (23"x23"x34")
|
|
Tanks were shipped as is. No box needed... Top is the 110 gal black water tank. The bottom two are the 70 gallon fresh water tanks. |
If you need a tank or new head or anything in between, be sure to go to the Ardemco web site (
www.ardemco.com) and check out there tank dimensions. You will be treated like a real person and offered the best deal around. Walt Wilson is at ardemco@earthlink,net. Be sure to tell him hi from Mike Wolfe and that "The River Queen Refit" sent you!
Installation
:I took some long hours of deep thought to engineer what was to be the replacement holding tank system.. When I came up with the right plan I started saving up the money. This was not going to be cheep. But with first rate parts, tools and a rock soled plan I was going to do this once and for all. Never to have too do it over again! (I hope.)
My boat is old and I never trusted setting anything heavy on the stringers. My first holding tank design had a plywood sheet screwed down right on top of the stringers with the tank strapped down to the board. Now in retrospect, way too much stress on the bottom of the boat for my liking.
The new design had many changes and involved cutting up the galley sole and building a sling of sorts to suspend the tank from under the steel sub-floor bracing, so as never to be touching the bottom of the boat at any time. This also made it easier to get the right angle for the flowing of down hill to the dip tube or stand pipe. I had the holding tank fittings plumbed to the closest end to the toilet keeping hose runs as short as possible. Be sure to make all hose runs so that there are no low spots or dips where waste can stand in the hose. This can cause foul smells to permeate the hose walls and stink up the boat. My old design had a big dip! Now when I flush I get a clean run all the way too the holding tank! "Yep. Nothing like a clean flush."
I’ll not boor you with all the details of the tank installation but I will give a quick over view. To get the large long holding tank installed down in the galley sole it involved cutting out six of the 2 x 2 steel floor brace’s. This meant I got to go buy a new "Saws-All" I just love new tools. Once easier access to the bottom of the boat was made I would have to be crazy not to clean and treat the rusty parts and paint. So I did. I turned out to be one of the hardest parts of the job. In order to put everything back nice and sound I had to make steel brackets. Two for every cut, one on each side of witch I cut from steel flat stock. I figure that I had drilled well over two hundred holes in all. That also means that I got to go and buy a new "Drill Doctor" bit sharpener! Advice here... Two words. Sharp bits. Steel boat and sharp bites. Ok that’s like four words but you get what I’m saying here? I’ve had this boat for almost five years now and must have bought six different drill index’s and all of them dull and used up by now. The Drill Doctor takes only half a minuet to sharpen a drill bit and your back to work. If your like me you’ll have six of the same size drill bit. When a bit slows in cutting I just change it out with another and keep working. At the end of the job I’ll sharpen all the bit’s at once over a cold beer.
I used locking nuts on the threaded rods, then added a second nut on top of the lock nut for good measure. I was also sure to use "Lock-tight" thread sealant on all of the bolts holding the floor brackets together. I don’t want any of it coming apart with vibration. I finished the whole thing off with a fresh new piece of 5/8 ply wood to walk upon.
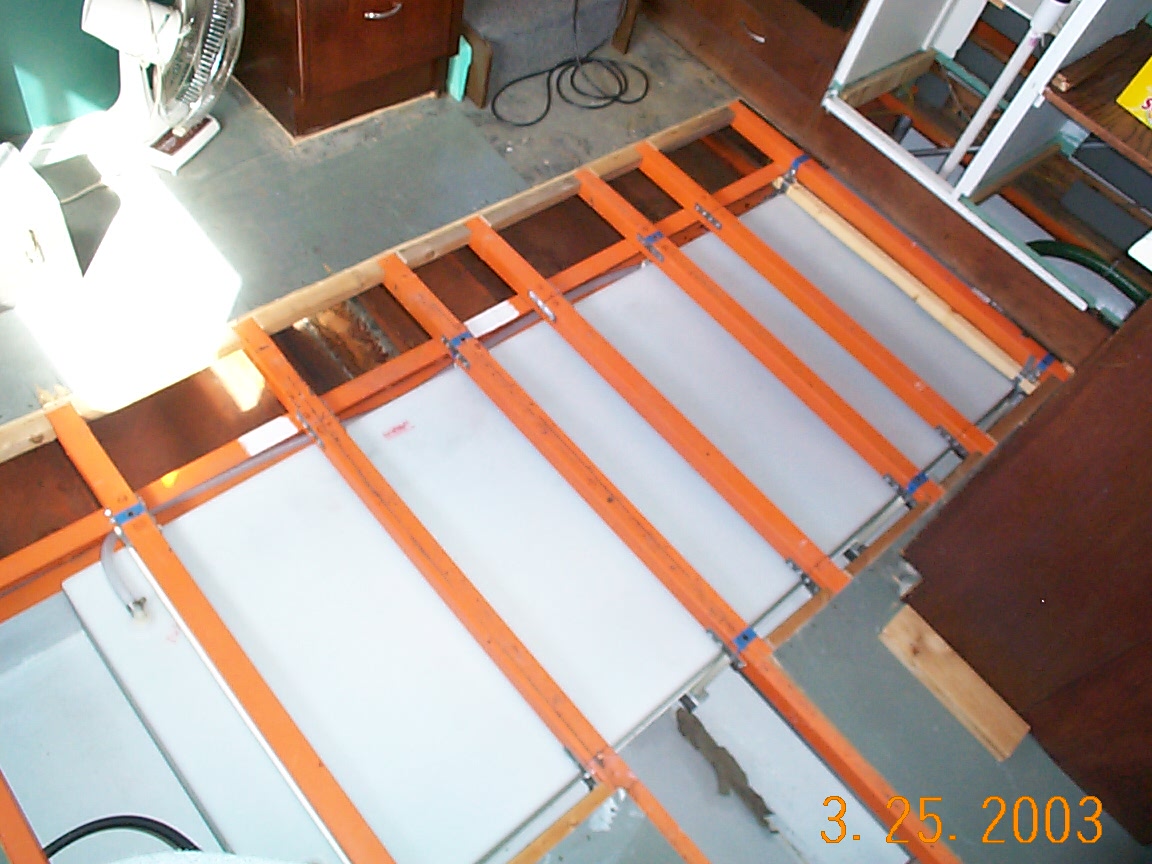
Here the tank is supported under the galley floor. Off set so that the pump out end is lower.
The one extra thing I had to add to the whole project was a multi tank fluid level monitor. I can’t tell you how many times I went to my knees with flash light in hand to try and see the level of a holding tank. Granted you wouldn’t be a very good skipper if you didn’t pop a hatch or two now and then to look in the bilges but it sure is nice to just hit a switch as you pass by it for a quick look at your levels.
In conclusion:
All in all I would say I spent close to a thousand dollars on the whole project.
Toilet rebuild kit, holding tank and monitor as well as parts and materials. But oh what a nice set up and so worth the peace of mind. I figure that means my first crap cost me $1000. The next one will only cost me $500. So on and so forth. I may just keep track till I’m down to under $1.00 a dump. Doing the math, in 10 uses I’ll be down to .97 cents a flush. Worth it I’d say... Now all I need to do is install a good sized magazine rack and exhaust fan...
So... Looks nice? Don't be fooled. It won't stay that way. A second re model was in the near future!
Mike Wolfe "The River Queen Refit" Spring 2003