It's
not that good of a picture but it's a taste of things to
come. From this picture you can get the idea of the size
of the newly remodeled full bathroom. It was once two
small heads but the last owner (Liveaboard) made it one
big one. We ripped it down to the frame due to rot and
stink. I had to install all new black tank and fittings
and put a rebuild kit in the toilet. Of course while the
floor was out I had to de-rust and paint the skin (hull)
below decks. You can't see it from this picture but the
forward side (port) has a very large mirror on the wall.
This has a wonderful expanding affect!
|
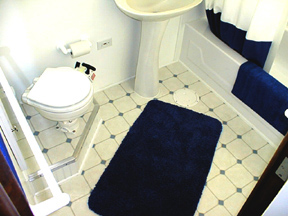
We finished off
with a raised platform for the head and all new plugs,
switches, fixtures, and floor. It now has more square
footage than our master bathroom at home!
|
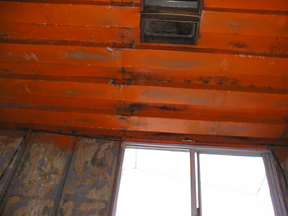
Here you see the soon-to-be hole for
the AC unit (Top) and the back door. I was superized at
the amount of steel in the overhead.
|
Yep! All steel! I will go back with
thicker insulation and stronger frame work.
|
We also had the aft cabin all
torn apart down to the bones and it's now going back together
very slowly. All the skin holes and rusty spots have been
repaired and the sub-wiring and electrical boxes have been
installed, as well as the new foam insulation. Next comes the
Cap. But before I can do that I need to be sure that the big hole
where the AC unit once was is completely sealed up.

|
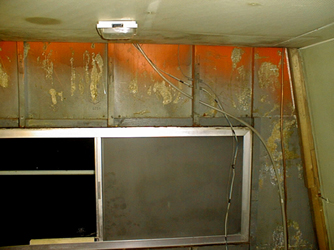
In the image to the
left you can see that the AC on top has been removed and
a plate installed in it's place, with extra suport added.
Behind me you can see the new 3/8 inch wood sheeting I
used to cover the old door and hinges to the old master
head that was totaly redone in earlyer in this project.
Overhead I follow the the same ruteen as I have all over
the boat. First you have to bare the metle. Clean it.
Remove any exess loose meterial (rust) with a wire brush.
Kill the remaining rust with a "Rust converter"
turening the metle black in color as it does it's job.
Then paint it with the best stuff you can afford. I'v
been using "Rustolyum" primer. As you can also
see, I'm puting back a thicker higher quality fome type
insulation.
|
We don't want to completely seal up the
overhead where it meets with the walls as we need to keep some
ventalation able to flow in and around to reduce moisture. Next
I'll have to install the "fer-down" strips. This will
be the sub frame we put up that will attach the finel vinel
coverd ply board. The fer-down is made level and true by useing
shims and string. The shims are placed between the wood strip and
the metel overhead to adjust the up and down to a string base
line
So first the right hight must be determend and
your end pices installed to the desired hight or level. A string
line is then streched across in 3 or 4 places to provide you with
a grid to shim down to.
Being a tall man myself. (6'4") I enjoy as
much head room as possable. When the overhead was completely
removed for the first time it was a real "Wow" when it
came to head room. I was hopeing I might be able to gane some
more room when I put the overhead back but in the end it looks
like we need to go back same-same to match the rest of the boat.
But I'll tell you one thing. This is my boat and my refit. No
head bangers to be installed anywhere! All overhead light
fixtuers will be resessed! (It's a tall man thing.)
More to come as we finnish off more of our boat.
Back: