Updated 01/13/16
Rebuild
What I plan to
achieve here is the documented rebuilding of two old 1969
Chrysler marine 383 engines. Well, one at a time anyway. We'll
start with #1 portside. What you will see in the pages to follow
is my attempt at doing it the right way. But understand this, it
will be my way, and not necessarily be the right or safe way.
What follows is a story only. Not a rebuild manual! So sit back
and read on. Without having to get your hands dirty, you too may
learn a thing or two. My only hope is that it will help someone
in the future in a similar situation or give some light on what
is to come. Thanks for coming! Send me mail. Mike Wolfe. wolfman@inreach.com
A rebuild can be
a daunting project. I myself have never rebuilt a large boat or
auto engine. I've done my fair share of water pumps, starters,
carburetors and the like. I started working on engines when I was
a young man. Starting small with 2- and 5-horse Briggs and
Stratton lawn mowers with my dad. Moving up to rebuilding dirt
bike motorcycle engines with my dad, then to larger faster street
bikes (without my dad). Then time went by and I & my
soon-to-be wife worked on our 550 Jet ski together.
After the Jet ski was a fun one, a 1942 Mercury
Super 5 outboard. Completely restored after being found
buried in the dirt in a farmer's barn.
Lastly
was the 6.5 kw Kohler gen set project. (See Kohler
power plant)It
came with the boat and it was shot and in pieces.
|
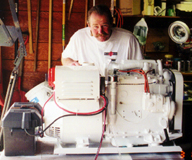
Looks
like a show room model.
(The
genset not me!)
|
So now what do I
do? Where do I start? You call the friend who knows Mopar. Get a
good book on it, and ask around. Then you extrapolate all the
information provided and make a game plan and stick to it.
Mistakes can be very costly and must be avoided. One wrong
component or procedure can cause a catastrophic failure and a
total loss to your rebuild. I shall move forward slowly.
One of the most
important things in the successful rebuild of a broken engine is
to do a proper post mortem during the disassembly stage. We want
to find a complete and sure reason why this engine failed.
Collect any and all evidence that you can find as you take things
apart. Don't be in a hurry to go scrapping and cleaning right
away. Stop and take the time to look close at the gasket seals.
Look close for derbies or chunks of ??? or burn marks. Talk over
what you find with your gear head buddy's or machine shop guy.
Enjoy this part of the job! If you don't catch the reason it quit
working, it may get past you on the Reassembly and you will have
done all for not!
Get Stuff Ready
Engine Stand:
It's time to
find a good used "Hemi type" engine stand. One that can
handle the big blocks completely loaded up and not sag or bounce
too much. I will be needing one for some time due to the fact
that once this engine is done I will have #2 engine to do. So
renting a stand would be out of the question. Also, when all this
is over, I could, at my leisure, build a third engine up as a hot
standby. (maybe not, we'll see) Thanks to good buddies like Dr.
Don, (Hi Don!), who heard my cry for help, I now have the use of
his Snap-on engine stand. All he wanted in return was a trip on
the boat. He said it was 10 years old and has seen only two other
projects. He said his wife said "Use it or lose it, I'm
tired of stepping over the damn thing!" It now has a new and
useful home... : )
Chain Hoist:
Pat brought me
an old, heavy and crusty 1/2 ton chain hoist/wench. This big old
"Yale" unit was caked with years of ??? crud, and
barely worked and it was heavier than hell! But it did work.
However, before I could trust such a unit on my engine, it needed
to come apart for inspection, cleaning, and testing.
I'm glad to say
that it cleaned up nicely and still seemingly works. Made a
big-ass mess, too. Now I need to clean and inspect every link of
chain. Yes. Every single one! Then I'll want to load test it...
How?
In the end I
found a sale at "Harbor Freight" and got a brand new
"one ton" (2000lbs.) unit. It had twice the load capacity
in half the size. $50. "Not bad" I think I'll feel safer using the new one.
Cherry Picker:
This is a dilemma.
The engine is in a hole. The safe but expensive way to extract
this engine is to take the boat out of the water (risk) and use a
big forklift using a long boom to ease it out. I'll bet at least
5 Boat dollars before it would be over.
(One "Boat
dollar" = One hundred you and me dollars)
My plan to date is
to dismantle the engine piece by piece in place, all the way down
to the short block. This would take a 1,300 pound mammoth down to
a plus or minus 400 pound "Pain in the ass." Daryl
tells me that 4 men, by hand could get it out and in the truck
easily. I don't think so. If one were to drop the engine in the
bottom of the boat it could easily put a big hole in it and we
don't want that now do we? I'll probably get a cherry picker on
board some how.
At the same Harbor
Freight sale, I got a new two ton shop crane ($189.) Normally
$240. Man is it cool! (orange color) I just love this stuff. I
had to take a picture after a fresh coat and wipe down of WD-40.
(To remove the shipping grease and finger prints.) By the time my
wife got home I was in her parking spot, crane fully extended
fifteen feet in the air, hanging from the top my 200 pound
freestanding shop vice with the new shiny chain hoist. There I
was frozen in the headlight beams like a deer in the middle of
the road. I was busted! New tools.
The old engines as
they sat.
#2 Engine.
(
Starboard)

Model
M383.BDL16/274
Serial
number E032920
PN 4/22
Runs.
Ticks, Smokes. Power steering unit works.
Barely
useable.
|
#3 Engine
KOHLER
electric plant
Model 6.5A23 (50226D7)
Ser#
312398 Kohler
Controller
# C-245479
KW 6.5 /
cycles 60 Volts 120 / RPM 1800
AMP/TERM
54.2 / Batt volts 12
Newly
rebuilt last year (1999)
|
#1 Engine.
(Port Side)
Model
M383/BDL16/274
Serial
number E032919
PN- 4/22
Runs, No
oil pressure. not froze) Bad tick sound. smoking right
bank.
Not
useable.
Coming
out now
|
Paragon
Gear works (Transmission)
Taunton
Mass.
Model
PD31-L
Serial
number SM-7101
|
Note that
on both engines and transmissions the serial numbers are
sequential.
|
Paragon
Gear works (Transmission)
Taunton
Mass.
Model
PD31-L
Serial
number SM-7100
|
It begins.
Some people can
do a wham-bam-thank-you-ma'am rebuild. No nonsense, get it apart,
get it fixed - get it built - get it in and get it on down the
river. This is not necessarily a bad thing...after all, the
engine does belong in a boat and not on the bench. However, to
proceed in this fashion you must have all the cash ready and then
you have to trust the guy that does all the work.
To me the boat
engine is the number two most important thing next to the hull.
If there is any question of its ability fire up and get you and
your loved ones home safely, you can never hope to be able to
relax and enjoy the boat for its original purpose.
My game plan
will somewhat differ. I can't say this enough times. "If you
treat the Refit project as a job, you will soon start to resent
the whole thing and end up hating the whole damn thing."
After, of course, emptying your bank account. Then having to sell
out, if you're lucky.
We are going to
keep the light-hearted, slow-going way of doing it. No rush. We
are going to have a good time on this new, not-so-easy project
and treat it as the hobby that it is. Concentrate on the task at
hand. One step at a time. When stumped, or lost on something,
sleep on it for a day or two. Roll it around in your head for
awhile. The answer will come to you. If you still can't come up
with the answer in a reasonable amount of time, ask a
"Mopar" wizard. Then you can proceed to the next step
on the list with a clear mind.
Call me weird
but I like to talk to the spirit in my engines as I work. It's
all part of the relaxation thing. I speak to them in a calm
positive manner, as would a doctor talk to his sick and worried
patient. "Now this may pinch a bit," or like a family
pet, "come on baby, open up, let daddy see." Never use
a cross tone or foul language at them. They don't like that and
can cause serious and costly complications.
: )
Before you
start.
Before you even
pick up wrench or screwdriver, the first tool you need to pick up
is a pencil. Draw pictures of the lay out. The hoses - from's and
to's. The same thing with the electrical connections.

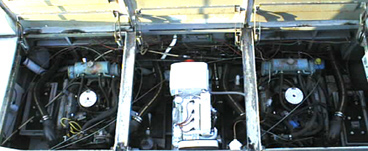
This is
#2. From here you can see the many hoses, wires and
cables that need to be recorded and removed.
|
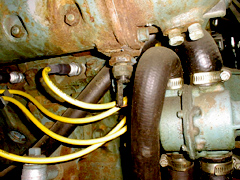
Some
places where my eye's can't fit to see I stuck the camera
in to have a closer look.
|
I also had the
use of a friend's data camera and took a good number of pictures
around the block, top and bottom for further reference.
Keep in mind, as
I found out later on, the way things are installed now is not
nesacaraly the way things are sapost to be???
Switched off all
the battery selection switches and disconnected the power, ground
first, and removed the batteries, close all the sea cocks and
turned the fuel off. I also removed all the coolant and engine
oil.
Now, time to
remove all the bolted on engine parts that can get in the way.
Pumps, pulleys, starter. The carburetor too. Anything that may be
in the way of a clean and lighter extraction.
In the mean time...
It's time to
clean of the work bench and put away all last year's stuff and
the tools from an in-between project. Wipe down all the wrenches
and replace a light bulb or two. Make room for some flat spots
for all the engine parts we will be bringing home. I have to
review, replace, or whip back into shape all the external bolt-on
components of the engine. Here's what I'm doing while I have
everything apart. "Record all your part numbers!" Write
them all down, each and every part that has a designator on it.
Measure things as well, pulley sizes and casting numbers, cable
lengths, all of it! Some parts have manufacturer names and
numbers all over them. Write them all down. This will help you
big time in the long run. When you need that certain part you
won't have to stand on your head to find the numbers or help you
on your way to obtaining spares. "Knowing the right part
number is directly related to getting the right part, the first
time. Especially if you are doing mail order parts" (First
time? That's a joke!)
Sea water pump:
Cool sea water
enters the boat via a through hull fitting/valve known as a
"seacock." Once in the boat the water passes though a
strainer unit with a clear service port to see if the screen
needs cleaning. This filters out most all of the larger stuff
that can foul the cooling system. Water then travels up and
enters this "Sea water pump" It's job is to charge the
one large line to the "Heat exchanger" with cool river
water. Cool water moves through the heat exchanger in a
criss-cross kind of way and collects what else? Heat from the
coolant that circulates on the inside of the engine block system!
Coming out of the heat exchanger from two smaller ports to flow
to the exhaust manifold elbows and then discharged out of the
boat from there.
This little pump
sure looks nice right after a bead blast job! I'm not sure if
it's brass or bronze or even a mix of the two. I do know that the
surface will turn a nice green color if left unprotected or
uncovered for long. I may not paint it. I did however paint the
cast iron pulley, it will rust quickly after bead blasting. This
pump was rebuilt with a kit last year before we moved the boat
for the first time. No more then three hours were added to the
engine's overall time since then. Looking in the end of the pump
with a flashlight I can see all the impellers still have new
shiny looking edges as I turn the pump over. All the blades were
there. Good, we don't want to go back in there if we don't need
too. I also did a quick check for end play by grabbing the pulley
and pushing in and out on the shaft. Nice and tight. No excess
play or slop. Post mortem. Nothing wrong found in this pump short
of running less efitionently causing the engine to run at higher
than normel temperature. So up on the shelf with it! Next to all
the other finished stuff. "Next"
Heat exchanger:
What a weird
beast! It's a neat part though. It stands up on top of the engine
looking all cool. What surprised me was the amount of busted pump
rubber inside this sucker. If you are a user of this type of
cooling system and never have had the ends off of your heat
exchanger, run, don't walk to your boat and go inspect it now!
One bolt on each side, one large rubberized gasket. A good
maintenance port for the future! With the amount of stuff I found
in this unit it must have restricted 40-50 percent of the total
water flow.
This unit is a
good looking piece of equipment. All the in's and out's all made
up of copper, brass, all soldered up. When you clean it all away
it's a real beauty! One other big point of interest, on either
side of the exchanger, tapped into the primary "sea
water" chambers are "zinc pencil inserts" These
must be pulled and inspected! Mine were so far gone I had to go
and look up on the internet just to see what they were!!! (Zinc
inserts to protect and add life to the engine and its parts.)
This heat
exchanger was a pleasure to do bench work on. With the caps off I
back-flushed the unit with the hose. More rubber parts and a
lot more stuff found. Then I capped all the holes and put some
mild solvent in it and let it stand for awhile. After a thorough
flushing and some drip drying we were ready to proceed. I made a
small wood stand to support the unit and keep it from rolling
around and hurting itself. The custom copper hose flanges are
soft and have been bent here and there. Using a small plastic
tipped hammer and a piece of round steel stock, I tap-tap-tapped
every dent out of the flanges. The wood stand will help protect
the fittings while under restoration and future transportation,
bead blasting, and painting.
Continued...
Electronic
Ignition... Do it or don't.
Before I had
decided to start the rebuild, both engines were kinda working.
One friend (Dude) told me, "Electronic ignition! Yes!"
I liked the idea but I was unsure. I needed more information.
Another friend (Del) said "Electronic ignition will over
stress your old rings and you'll blow a hole or break
something!" I thought, "When in doubt, don't spend any
money!" And I didn't. (Good thing)
In the case of
this rebuild project, I say we go back in with E.I. I have done
all the home work and reading. I even instituted the pro's and
con's list of which I could not come up with any con's? Other
than the initial cost of installation.
On the pro side,
we have hotter spark. No points to go bad or replace. Continuous
faster and smoother starting means less wear and tear on the
starting system. It's newer, proven technology. I'm sure there's
more for it.
So it's shop
around time on the internet. See and get a feel for what's out
there and what the cost is. Most people want you to think of
adding more and special parts for more speed, more power. Adding
after market bolt on items to your engine is usually to boost
horse power or add rpm's. Well I don't want any part of that. I
already have 260 horses per side. What I want is to put this
thing back together as flat and as bullet proof stock as
possible. I don't want to have any finicky speed parts or add any
additional horse power that might over match the transmission and
out drives. I'm sure my new rebuilds will next to never be run
over 4,500 rpm.
Engine Heads:
Of the two heads I
pulled off #1 engine, none of the casting numbers matched 1969
and Jim at the shop didn't like the looks of either one of them.
The one spare head we found in the forward hold had 1968-70
casting numbers on it and must have been original equipment. It
looked as if it had been rebuilt and ready to go but I'll have to
send it in to the shop and have it checked and serviced before it
could ever be trusted. In the mean time I'll look for a
replacement head with the same cast numbers to match. I didn't
have to look long. Brian over at "Delta Propeller and Machine" had a matched set for sale. Seme casting numbers to
my surprise! All I was interested in were the cores. We settled on
$100 bucks if they magnafluxed ok and passed muster with Jim.
They did. So I got them and the rockers and rocker shafts as
well. Part of my master plan is to use the best two of the three
and finish the 3rd head to keep as a spare (Haven forbid). Don't
forget, I have a second engine to go yet.
Engine assembly:
The remainder of the
engine assembly lasted for the next several months. Great care was given to
assure a proper reassembly and fit for every part. Every thing that went back on
the engine was bead blasted, inspected, repaired, refinished, re-blasted and
painted. She sure looked pretty.
It
took a wile to finish all the electrical components and there connections. Once
upon a time thought I knew all the workings and logic of the internal combustion
engine but many years of not doing it caused a lot of my knowledge to laps away.
It’s a damn good thing I got a good buddy that seems to remember all the
things I forgot, and without him I’d have been sunk many time over! (Thanks
Deller!)
I
due course the reassembly was complete. What a buety! Boy she looked good
sitting there on the test bed ready and rearing to go. I should have, there and
then, hooked her up and tried to start her. But I didn’t.
I was a little scared I guess. Then I got sick. Then the family car got
sick. Then our vacation out of state came along. Then I was waiting for my
partner to come back from his vacation… Excuses. Excuses.
Start
your engine:
So
here we are, three months or so later. After all that my wife said “Come on,
get up! Get out there and start that beast!” I said… “There might be
flames!” “I might catch fire and blow up!” She said… “I promise I’ll
put you out if you catch fire!” “NOW GET OUT THERE AND DO IT!” “Come on,
I’ll help you. What do we do first?” (What a dear.) All that remained to be
done was to recheck all my wirework, prim the oil pump, hook up a remote
start/stop button and throttle. Everything else was set. Water feed, fuel pump
and sores.
We
were ready...
At
first there was a lot of turning over followed by nothing? Then a “Pow!”
(Backfire) “Hmm” Should have taken right off? Ok, on the phone to Deller.
“Did ya do this?” Yep. “Do that?” Yep. “Well try this and that and
call me back” ok… Before I was going to go long on anything I thought I
would review the firing order. Now some marine engines run in the reverse mode
for prop counter-rotation purposes. I know for a fact that both my engines are
“right hand rotation” hence on the engine information plate reads
“M-383-R” The “M” is for “marine.” Of course the 383 is the engine
size. The “R” is for “Right hand rotation.” My reverse rotation is
accomplished via transmition, not engine rotation. Upon the reevaluation of my
copy of the Chrysler marine manual, depicted there are diagrams of both
“right” and “left” hand sparkplug configurations. “Can you guess what
I did?” “Yep.” In short order I had all the sparkplug wires in there right
locations for the right hand engine rotation. Ok, here we go…”EVERYBODY
STAND BACK!!”…. Ignition on. Pump the throttle once for a drink of fuel and
(Hart pounding) turning the starter switch… My ears were reworded with the
rich wonderful sound of a big block Chrysler roaring to life! What a sound.
Music too my ears. It wasn’t as loud as I thought it would be but it was loud
enough. Man it sounded cool! The kids were jumping up and down, the dog was
barking, and my wife was clapping as best she could wile holding the “fire
blanket” and “fire extinguisher” she was going to put me out with should
things go wrong. (Good girl) The first run lasted about three minutes till the
small amount of fuel I used ran out. The ringing silence that followed was a
fond memory that will last indeed. It worked. It worked well. It didn’t run
then bust. Whack, or crunch. No bang or boom. No fires. No sparks. This was a
good thing for sure. All these fears of what might happen on start up were pent
up inside me all the way along the whole rebuild. All the money spent on parts
and machinening. All the long hours spent in the cold garage, truly not wasted
at all.
Of
course what was to follow was an emeadieat refueling, and at least three
separate “speakerphone calls” too Del, Barry and Carl demonstrating the
“Majesty and ausom roar” of a big block start up. (I had to share right?)
All call participants demonstrated proper levels of enthusiasm and
congratulations. Without these
great guys I could never have done it. (Thanks guys!)
Fine tune:
It
didn’t take too many days for Daryl to find his way to come visit and help me
do the final tweaking of carb and timing and such. By the time we finished with
it I’m sure the neighbors were done with it too. Although loud, the sound has
an alluring quality and drew in some of the local males as well as kids for a
better look-see. The engine was responding well indeed to our efforts. Temps
were good. (141) The carb rebuild held fast. No leaking of fuel of any kind and
all the linkages were working nice and smooth. We had a slight oil leak under
one valve cover. (No biggie, after the future re-touqueing of the heads I’m
going back with “Felpro cork” gaskets.) No other leaks, oil, coolant or
water were detected.
Over the course of the
next week or so I would start the engine now and then and get her up to temp.
Look for leaks, cracks, and /or flaws. None were found : ) A total of about five
gallons of fuel were ran through the engine and all seemed fine like wine. On to
the next step…
To
re-torque, or not to re-torque?
That
is the question...
I’m
talking about the engine heads after they have been installed on a rebuild.
I’ve heard arguments in all directions of how best to proceed. One guy told me
that if you re-torque ten minuets after the first time around that that’s good
enough. (I did that.) Another fella told me to run all the bolts down to spec,
then loosen them all up to finger tight. Then re-torque everything back down
again. He said that would be good enough and that re-torqueing later on would
not be nessery. (I didn’t do that.) The guys at the machine shop said that
would be bad due to the compression of the metal gasket. It should be compressed
only once. They also say the best
way is to re-torque after the engine has come up to temperature 3 or 4 times.
Just another good reason I had set up a test bed in the shop. (I did just that.)
Once I was satisfied with the run in and hose configuration and everything was
proved to work right. Then it was time to pull off the manifolds and valve
covers in order to give access to the bolts and re-torque the heads. I was glad
I did. The left bank had 7 or 8 bolts that turned a bit, but the right side had
only one that would turn. But still, all and all, to better maximize the life
expectancy and integrity of the heads, and there gaskets there of. I do believe
it’s well worth the extra effort to do it right and re-torque.
Prep
for transportation and re-insursion.
The
size and weight of the fully completed, ready to run “Chrysler M-383-R”
engine is huge. Not as huge as some, but It’s pretty darn big. Not just big,
but heavy. Like around 1500 lbs. When I de-installed it from the boat I did it
in pieces. You know, heads, manifolds, starter, pumps…the block was not to bad
to extract on it’s own. But put it all together and man! You got some heavy
stuff! How am I going to get it all back in? First of all I’ll leave all the
exhaust manifolds and all their apparatus off. That will shave a couple of
hundred pounds. No oil. No water. It’s still going to be heavy as hell. I
shutter to think of what would happen if some how it were to fall into the
bottom of the engine compartment! (Let’s not go there ok?) However for
safety’s sake we need to always keep that the bad sinareo in our minds in
order to proceed with a proper amount of safety and sanity.
And
no booze till after…
The old “in and out” routine.
I agonized for months and months over the
installation details and procedures for getting #1 engine back in its spot. Step
by step. Safely. Without incident. My friends think me anal to brood over every
little thing. There were so many preparations to do before I could put the
engine back in that I was a bit surprised when it finely came time to pick a
date to reinstall it. It was like “Well, here we are. Wow.” I’m not really sure why I came up with that next Sunday at
10: a.m. but it gave me some extra time for a buffer. I had to weld a counter
balance bracket for the picker, then test it in the grange at home first to be
sure of the proper load set up. All worked well, and everything seemed set. The
calls went out and manpower was arranged. On that next Friday morning the
weather reports were looking bad, and bad went to worse. Rain Sunday. (Damn) We
could see it on satellite moving in and looking long lived. I didn’t want to
push the date out. I was all set! Good to go. A week’s wait would be too
painful, so I made the call to bump. Yep! “Today’s the day.” I said.
Sun is out, and the tides are high. Winds are calm. Life is good. I made
the phone calls and the guys showed up by that afternoon. The new engine went in
slick as a whistle and the old #2 engine came out just as easy. The whole
operation lasted less than 2 hours and we were done well before dark. Backs were
slapped. Beers were served. Stories were told. Nobody got hurt. Nothing got
broke.
Anil my ass! Planning pays off…
A special thanks to my installation crew… Deller, Carl,
Kevin, and Randy.
Photos by Deborah
Mnw ; )
On to the next
page
River Queen Refit page.