|
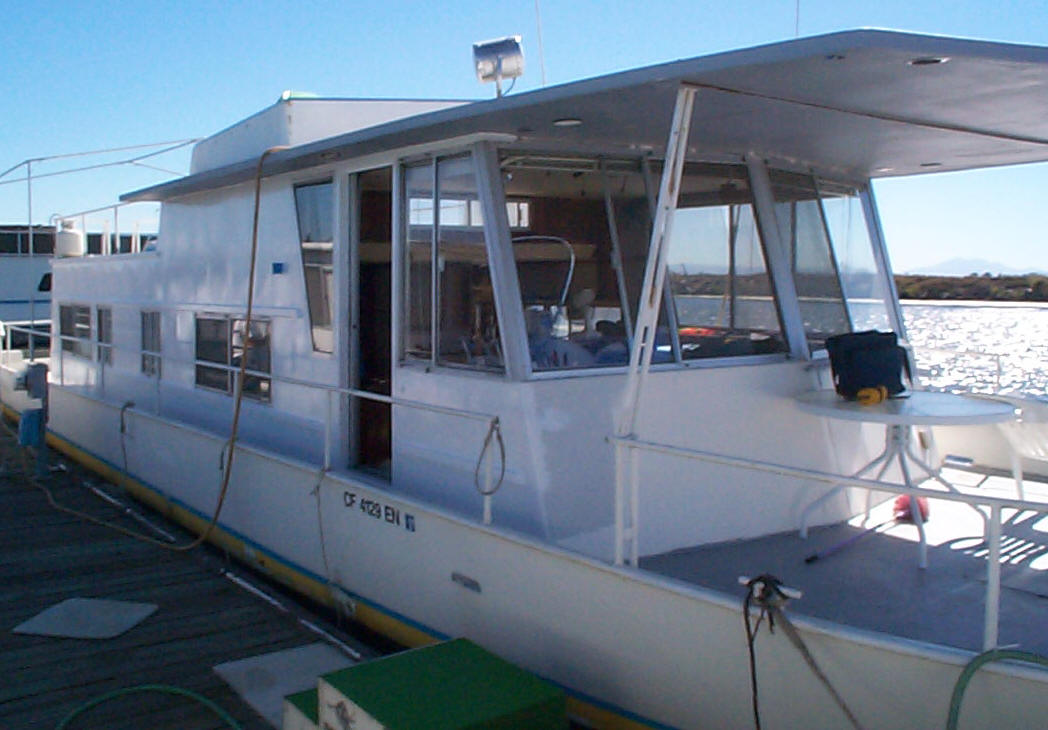
Wings?
Is that what you call them?
That piece of roof that sticks out over the companion way on either side
of the boat. Well that’s what I’ll call them for now, until I learn better.
And what is that roof thing that sticks out over the bow area? Is there a name for that? “Bow
overhead” maybe? It’s hard to
get all the names correct on a craft that’s not quite a yacht, but looks like
a houseboat and acts like a cruiser. The important thing is that you know what
and where I'm talking about as we progress.
We don’t want to lose anybody on the tour. |
 |
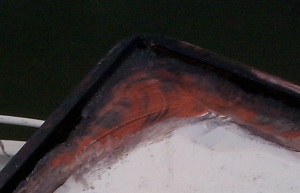
Well I have to tell you, when I bought this boat I knew I
had some work ahead of me with regard to the weather side of the “bow
overhead” and it’s “wings”. As you know, rust can and will grow under
the paint and cause a “rust blister” to rise. I see them here and there,
everywhere! Actually, in my dreams at night too. Some / most, are a simple fix.
Pick it. Flick it. Sand it. Treat it. Fill it. Paint it. But others are not. Way
not! As in the case of my bow overhead and wings.
I discovered this problem early in my project
while we were
still in the haul out yard. I had some spare time and a new sharp scraper in
hand and went to investigate the row of blisters along the top edges of said
overhead. The rain gutter part on top. (Man, I can feel myself reliving the pain
as I type this.) The carnage
I was beginning to uncover was… “Disastrous” to pick a word. So I traded
up my little hand scraper for the “L” grinder with a big wire wheel on
it, (my personal favorite), and went
after it with a vengeance! The
stiff wire wheel does a great job of removing anything that isn’t steel and
pitching into the sky as well as up your nose.
Old caulking, paint, goop and shit, and of course “rust” with bits of
metal were flying everywhere! Trailing behind, the wreck and ruin of a once
beautiful design. What remained was the long and jagged rusty teeth of a
horrendous gaping maw.
|
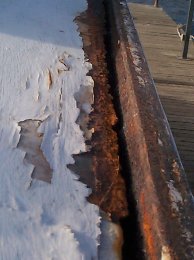
Horrendous gaping maw.
Miles of it. |
What to do, what to do… I’m telling you it looked
horrible. By the end of that day, as the sun was setting. I was beside myself.
My wife Deborah was beside me, beside herself. We needed a plan and soon. Winter was
coming...
Three beers and two shots of “Jim Beam”
later I was feeling a bit
better. (Gee, ya think?) |
|
There was to be no quick and
cheap permanent fix at this
time.
We were out of ready cash. Out of time, and out of
patience, and winter
was coming in fast. The best we could do would be to seal her up for future
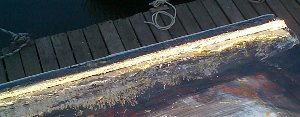
consideration and resources. You're going to laugh at what we used but it worked.
And it worked for the following two years very well. “Duct tape” Yep. Tape. It went down fast
and easy. Two or three layers. Now if I were a “Good ol boy” I would have
left it at that. Silver color and all, but two or three coats of paint on top of
the tape and she was all buttoned up. Ready for a mild California winter or two.
|
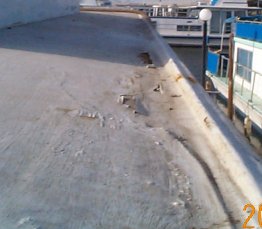
After a two year tape job. |
|
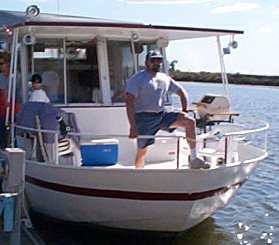
Barry and his Queen. |
The Fix.
I was thinking all the while that a repair of such magnitude
and presumed difficulty would be a truly daunting task. Involving the cutting,
welding and grinding of steel. Mayhap pounds of epoxy? Any way I looked at it,
lots of “blood, sweat and tears” (money) were to be spent. The fix idea came
from my friend Barry. He has a RQ 40 that had a similar problem but not as bad.
Actually, I would bet that all River Queens in and around this age suffer the same
problem. My hats off to him and his simple fix plan. Publicly- "Thanks
Barry"
|
Removing all loose rusty, crusty material in the affected
area is paramount. I dive in with my trusty scraper and remove all the loose
stuff first. Also, to get a general overview of the mayhem to follow. Then forage
in with the favored “L” grinder with a wire wheel attachment
removing anything that’s not metal. If it isn’t solid and firmly attached,
the wire wheel will make it fly off at this point. (Face shield and dust mask
are a
must) I try to clean up as much as I can as I go along. Work a bit, sweep a bit,
vacuum a bit. When you get a full clean view of the affected area, I would
suggest a sit down and a quiet cry. Because it will look like hell! Do not
despair. Change your wire wheel attachment for a 40-50 grit sanding disc and go
after it again. Take down the high spots and feather off the affected old paint
area. Follow any rust path as it runs under the paint. Don’t stop till you see
nice shinny metal. You have to expose all the rust in order to treat it. If not,
it will creep back like a cancer under anything you put on top of it, and in a
years time or less you will be chasing down a new rust blister. Better to get
it all now while you’re at it. If you do it right, you may need never return
to that same spot ever again… (Wish)
|
Convert it. |
 |
Vacuum as much rust and debris out of the cracks as you
can. This is a good time for reviewing the damage done and using a strong
picking tool to loosen and remove the stuff the wire wheel could not break
loose. Once you're sure all the loose rust and flaking metal is removed as best
you can it’s time to treat the exposed metal with a “rust converter”. This
is the most important step and should never be skipped. The brand names vary,
and I have used them all at one time or another. One pint at a time. Take your
pick. Just buy a lot of it. It’s better in the long run. You’ll need it. A
gallon should last awhile on board. This stuff is great! Here’s the part where
your tears start to dry and you start feeling better about the project. Rust
converter goes on like 2% milk. (Well, ok, I’ve never actually painted
anything with milk before. But if had…) Put this stuff anywhere there is rust.
Or where there might be rust. Brush it on the bare metal around the rust. You
will need two or three coats on the bad spots. Your first coat should be
generous and slathered all over the affected area. But don’t let it sit in
thick puddles or bubbled up. I reverse hose on the shop-vac and blow the
converter around causing it to travel and penetrate cracks and flow back where I
can’t reach with a brush. Then the magic happens! Depending on the brand of
converter, as it may vary, but the bare clean metal turns dark purple/black, and
the rust (once orange/red) will turn coal black and get hard. Then let it cure
nice and long. Make sure it’s good and dry. I’m telling you, this is good
stuff.
The “Hat
Trick.”
|
|
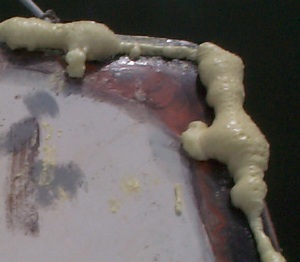
So what’s this great fix I’ve been leading up too? So
far it seems like S-O-P (Standard operating procedure edger) right?
Ok, I’ll tell you. Two words. “Caned foam" insulation spray.
You see the light yet? Simply
insert the tube in the “Nasty crack” spray under and all along the edge. Not
too much as it can “over expand” and cause over swelling. Also be sure to do
this on a calm day as the wind can blow excess foam on the boat next door down
wind. Oops. Acetone usually cleans it right up though. As the foam sets and
expands from the ugly jagged orifice, you can mold it with a trowel. (Sort of.)
Make sure all the low spots are filled in. Then leave it be. Let it expand over
and beyond where you want it. Once it has dried and is hard (72 hours is best)
it cuts easily with a mat knife or new hack saw blade. Then sand to fit on the
low side of the surface. Meaning, I still want to add a small layer of “Marine
Tex” epoxy putty over top the softer foam for a complete and hard seal. Then
sand for Finish and paint! There ya go! No welding, hammering or grinding.
|
Thoughts
Before you inject any
foam I would be sure the area is
completely dry inside. We wouldn’t want to trap any water inside. Also do this
simple test first. Take your fist and knock on the effected area. Hear a rattle?
Sound full of stuff yet hollow at the same time? Take and grab the wing and
wiggle it a bit. Flimsy? Loose? Surface soft? Now do the same tests after the
repair job is complete. You’ll hear and feel a big difference. One I’m sure
you will be happy with…What we are left with is very sturdy. Reinforced with
strong “closed cell foam.” All the air space inside is displaced so as not
to harbor moisture, bugs, heat and noise. I would put a “No Step” sign on it
though. Why push our luck…
You would think I would have a picture of the completed wing repair??? Ok... Ill
try to find one or take a new one.
In closing...
Please realize that all this is a “Cheep fix” with an
expectable outcome that I hope will last a long time. ($2. a foot or less.) The
proper way of course would be to cut, torch, grind away the bad, and install new
steel. To me this would be a long and costly adventure. Maybe $60.- $100. a foot or
more. For now, I’m keeping costs down as much as possible. I still have Number
two engine to rebuild…
My thanks to Barry.
"Good one there bud. Keep them coming!"

Mike Wolfe
“The River Queen Refit.” (Summer 2001)